Audimation Services has been acquired by Caseware International Learn More.

Importing data into IDEA is a popular topic. But sometimes, it might be useful to take those IDEA databases and work on them in another application such as Tableau or Microsoft Power BI. Of course, you could always export the data to Excel or text and then import the data. But a more efficient way would be to use ODBC to view the data in the other application without having to import the file. The new IDEA ODBC driver makes this possible.
Your IDEA version 10.3 ODBC drivers can be downloaded from the link below:
https://www.dropbox.com/sh/fltn70l19rqzms9/AABfjB_iXj7I5H90AhDtm5dTa?dl=0
(Note that these drivers require that the IDEA software is installed. They will not work for any other application.)
Follow the link and download the .zip files you need. You’ll notice that there are two drivers (a 32-bit version and a 64-bit version). Choose the version that matches the bitness of the application you are using to view the IDEA data. If you’re not sure what bitness your application uses, you can usually find it in the “About” section of the application. For example, my installation of Microsoft Power BI is 64-bit:

If you’re still not sure, please feel free to contact our helpdesk and we can help you find that information.
Also, note that you can have both drivers installed on the same machine.
Prepare to install the drivers by making sure that IDEA 10.3 is installed on the same machine. Take a few minutes to read the Release Notes.HTML file. This file contains information that will be helpful for the installation and use of the drivers. Make sure that you extract the installation files before beginning the installation.
To begin the installation, simply double-click the executable file named IDEAODBCDriver_x64.exe or IDEAODBCDriver.exe. if you are installing both drivers, you will need to run both executables separately. This will take you through the install wizard and install your drivers.
Now, that you’ve got the driver(s) installed, you’ll need to do a little extra configuration before it’s ready to be used. Specifically, you’ll need to set up a DSN that defines a connection between the driver and the folder where your source files are located. DSN stands for “Data Source Name”. It’s just a way to tell the ODBC driver where the data resides. Whenever you use that DSN, you will always access files in the same folder. You can create multiple DSN’s if you need to do so. Your other application will use this DSN to reach the data.
Click the Windows Start button > Control Panel > Administrative Tools > ODBC Data Source. Notice that there are two versions of the ODBC Data Source tool (64 bit and 32 bit). Open the one that matches the bitness of the application you are using to access the IDEA data.
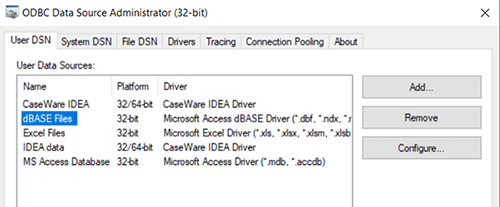
When the ODBC Data Source Administrator opens, click Add. You’ll be prompted to select from a list of available ODBC drivers. Select the CaseWare IDEA Driver and click Finish.
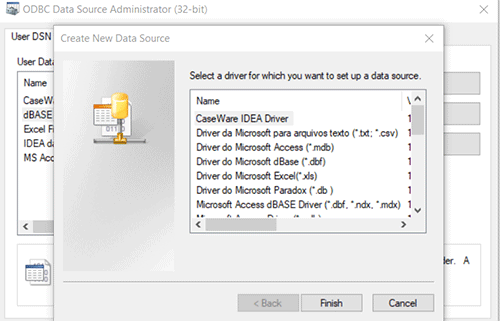
This will take you to the CaseWare IDEA ODBC Driver Setup Screen.
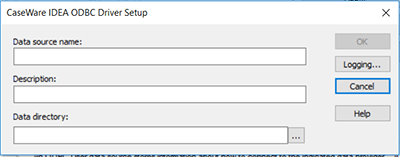
Name the connection in the field under “Data source name:”. Any name will do, but I recommend making it unique so that it will be easily identifiable. In the field under “Description:”, type in a brief description of the project. Again, you are free to enter whatever you like here. Finally, click the browse button (…) next to the “Data directory:” field and browse to Windows directory where you want to pull your IDEA data from. For example, I wanted to view data from my Samples project, so my Driver Setup window looks like this:
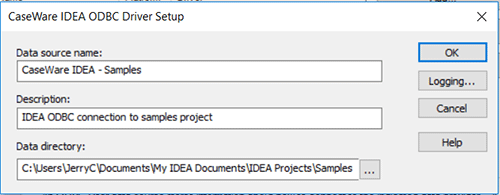
Finally, Click OK to close the ODBC Driver Setup Window. You should see the new data source listed in the “User Data Sources” list under the User DSN.
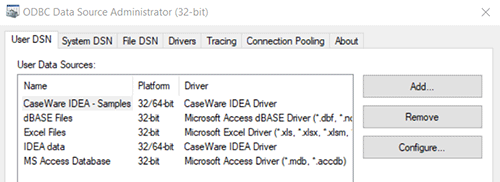
Click OK again to save the connection and close the ODBC Data Source Administrator.
Now your ODBC driver is ready to use. At this point, the exact steps to open the data will depend on the application you are using. In most cases, it simply involves beginning an import and choosing ODBC as the source. You’ll then get to select the DSN you set up earlier. Once you’ve done that you should be able to pick from the IDEA databases in that folder.
Now you should be able to use the other application to create your views and visualizations based on the data in the IDEA database.
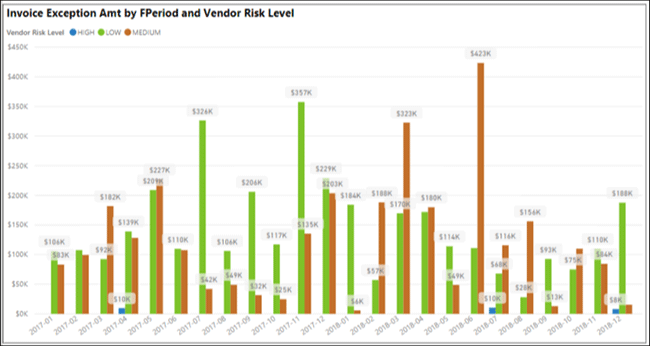
We hope this will be very helpful to your team. And, as always, if you have questions about this Tech Tip or other IDEA questions, please give our help desk a call at:
888-641-2800 Option 4
Or email us at [email protected]
This website has been designed for modern browsers. Please update. Update my browser now